Enable Entra ID Password Protection for Active Directory
Entra ID is the home of Microsoft identities for an organisation, but often these identities come from an on-prem Active Directory. That syncronisation is often a one-way street; accounts go up to the cloud, but changes don’t come back.
Entra Password Protection enabled policies set in Azure to be enforced by on-prem domain controllers. One such policy is the Custom Banned Password list, as part of Entra Password Protection features. IHead over here if you haven't already implemented account lockouts.
Microsoft maintains a global list of blocked passwords that it enforces for customer tenants. Using custom lists, it is possible for administrators to further define words that are related to their organisation, and stop users including them in their passwords.
Prerequisites
In order to implement this feature you will need:
- Entra P1 or P2 License
- A domain admin account
- A global admin account
- .Net Framework 4.7.2 or greater installed on all domain controllers
- The installers from here: https://www.microsoft.com/en-us/download/details.aspx?id=57071
To check the .Net Framework version, you can look in apps or simply run this command, which queries the registry key:
reg query "HKEY_LOCAL_MACHINE\\SOFTWARE\\Microsoft\\NET Framework Setup\\NDP\\v4\\full" /v version
Generate Custom Banned List
Before we start, let’s generate the word list we want to use. This is the Microsoft explanation in Entra:
A list of words, one per line, to prevent your users from using in their passwords. You should include words specific to your organization, such as your products, trademarks, industries, local cities and towns, and local sports teams. Your list can contain up to 1000 words. These are case insensitive, and common character substitutions (o for 0, etc) are automatically considered.
So, if you include foobar on your list, f00b4r will automatically be blocked. It also blocks the words appearing in the password at all, so foobar2026 would also be blocked.
That means you don’t need to include every variation of every word you want to block, which is handy because the list is limited to 1,000 entries. Pick common words associated with your organisation, but don’t make them too short to avoid false positives.
Configure Entra ID
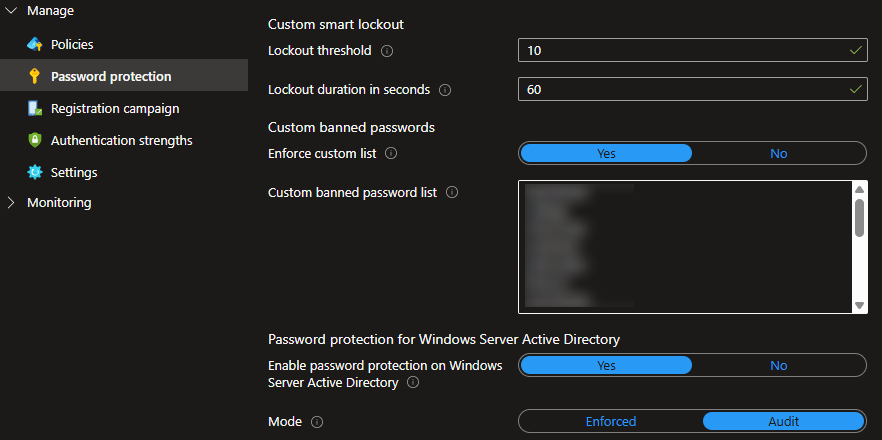
We can now configure Entra ID. Initially we’re going to use the policy in Audit mode so we can test the impact before we enforce it.
- Go to Authentication Methods
- Go to Password Protection
- Copy your list into the Custom List box
- Turn on Enforce custom list
- Turn on Enable password protection on Windows Server Active Directory
- Set the Mode to Audit
- Save the changes

Deploy Password Protection Proxy
The Password Protection integration has two components - a proxy and an agent. Each DC will need the agent, but only one (or two, for high availability) will need the proxy. Only the proxy communicates with Azure.
I’ve chosen to install the proxy on our main DC, but it can also be installed on another server that isn’t a domain controller.
Run the AzureADPasswordProtectionProxySetup.exe. The installer doesn’t need much interaction and will complete quickly.
Once the proxy is installed, we can register it using the following PowerShell command:
Register-AzureADPasswordProtectionProxy -AccountUpn "<GlobalAdminUPN>”
Complete the Microsoft authentication with your global admin account.
Deploy Password Protection Agent
Run the AzureADPasswordProtectionDCAgentSetup.msi. Again, this requires minimal interaction and will complete quickly. The domain controller will need a restart after installation.
Repeat the agent deployment for any other domain controllers.
We now need to register the forest with Entra using the following command:
Register-AzureADPasswordProtectionForest -AccountUpn "<GlobalAdminUPN>”
Complete the Microsoft authentication with your global admin account.
Verify Installation
We can use the following commands to verifiy the installation.
Get-AzureADPasswordProtectionProxy
Get-AzureADPasswordProtectionDCAgent
You should see details of the connection. Ensure your tenant is registered, and there is a heartbeat timestamp.
You can also check the event logs here:
Event Viewer > Applications and Services Logs > Microsoft > AzureADPasswordProtection > DCAgent > Admin
Look out for the following Event IDs:
- 30006 - The service is now enforcing the Azure password policy
- 10015 - A password was reset in compliance with the policy
- 10025 - A password would have been rejected due to the Custom Banned List
- 30009 - A password would have been rejected due to the Global Banned List
Enforce the Policy
Once you’ve monitored the impact and are happy with the results, return to the Password Protection configuration in Entra ID and move from Audit mode to Enforce mode.
Remember, this policy only impacts users when they reset their password; existing passwords won’t be assessed.
Once the policy is enforced, look out for these Event IDs:
- 10015 - A password was reset in compliance with the policy
- 30003 - A password was rejected due to the Custom Banned List
- 30005 - A password was rejected due to the Global Banned List
Conclusion
Preventing users using passwords that are easily guessable to anyone who knows something about your organisation is another step in hardening identities, reducing the impact of password spray attacks.
Whilst this policy ensures that passwords are more secure, it must be paired with a secure multi factor authentication policy to create layered protection for identities. The custom word list should be reviewed and updated as often as required to ensure it stays relevant.
By enforcing these policies you’re actively reducing the attack surface of your organisation’s most targeted assets - the identities.