802.11k, 802.11v and 802.11r: The Holy Trinity of Roaming Standards

Tackling roaming devices in an enterprise environment can be challenging. Ensuring clients can move between access points seamlessly requires careful planning and management of signal strengths and channels.
Devices can be stubborn, refusing to give up a connection to a weak AP even if there is a better one available. With modern roaming standards, enterprise wireless networks can now help encourage devices to roam, giving them all the information they need, and ensure that the roam is completely seamless. A user could be on a VOIP call and if all goes well, it won’t even skip a beat.
With the advent of Wi-Fi 6, fast transition between access points became an expectation instead of a luxury, but it is backwards compatible with both 2.4 and 5Ghz wireless. The only devices that might struggle are low-end IoT devices and printers, but these rarely move anyway.
The three standards are 802.11k, 802.11v and 802.11r, and these work in tandem to handle roaming users with ease.
Table of Contents
Overview
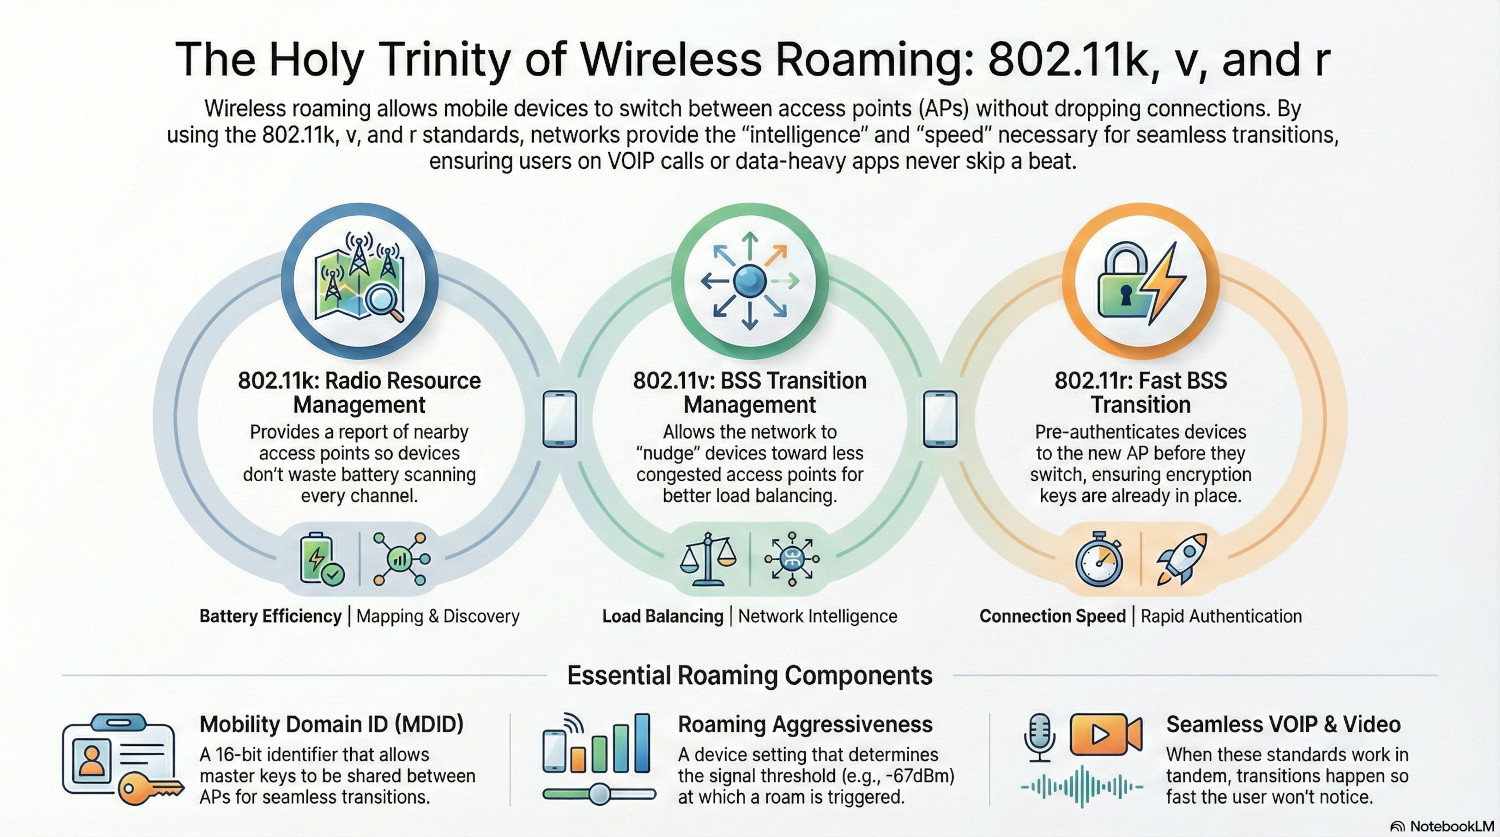
802.11k - Radio Resource Management
Constantly scanning every wireless channel to find the best signal is a resource hog for wireless cards, killing battery life on devices. 802.11k takes the burden off the end user device by providing a report of nearby access points without the need for scanning, telling the device which channels to scan.
APs advertise their 802.11k capability through the beacon frame, telling the devices that they are able to send neighbour reports. The reports are triggered by the device when the current signal strength drops below a set threshold or the SNR (signal noise ratio) is too high.
802.11v - BSS Transition Management
The next standard comes into play when the controller decides a client should move to another access point. If a neighbouring AP has a stronger or less congested signal, it will send an 802.11v frame suggesting the device moves.
802.11v is essential for load balancing. If one AP has 40 clients but the neighbouring AP only has 2, it can nudge clients to jump move over.
802.11r - Fast BSS Transition
Now the device has decided to move, it needs to establish a connection with the new AP. However, if it needs to perform a full re-authentication every time, it will slow down the roaming considerably.
The fast transition standard pre-authenticates devices to the new AP before they actually connect, ensuring encryption keys are already in place. This means while the device is still connected to one AP, it is sending authentication frames to the new AP. Devices can then switch over seamlessly without the user even noticing it’s happened.
APs advertise their 802.11r capability through the beacon frame.
Mobility Domain ID
Fast Transition requires a Mobility Domain ID (MDID). This is a 16bit identifier that defines a network area of access points, allowing master keys to be shared between them for seamless transitions.
If APs are broadcasting the same SSID, but with different mobility domains, fast transition will fail. The AP will respond with an Invalid Mobility Code error and the client will be forced to authenticate in full.
It is common for an organisation to have more than SSID, such as Staff and Guest. Whilst clients will look to roam to the same SSID, it is worth configuring different Mobility Domain IDs for different SSIDs to keep the boundaries distinct.
Windows Roaming Aggressiveness
This is the driver setting for the wireless card, which tells Windows when it should be looking for a better connection. Essentially, the lower the aggressiveness, the longer Windows will stick to one AP, even if the signal is weak.
This can be set in advanced driver settings in device manager. If set to Highest, Windows will start asking for Neighbour reports (802.11k) at around the -67dBm mark.
The Fast Roaming Process
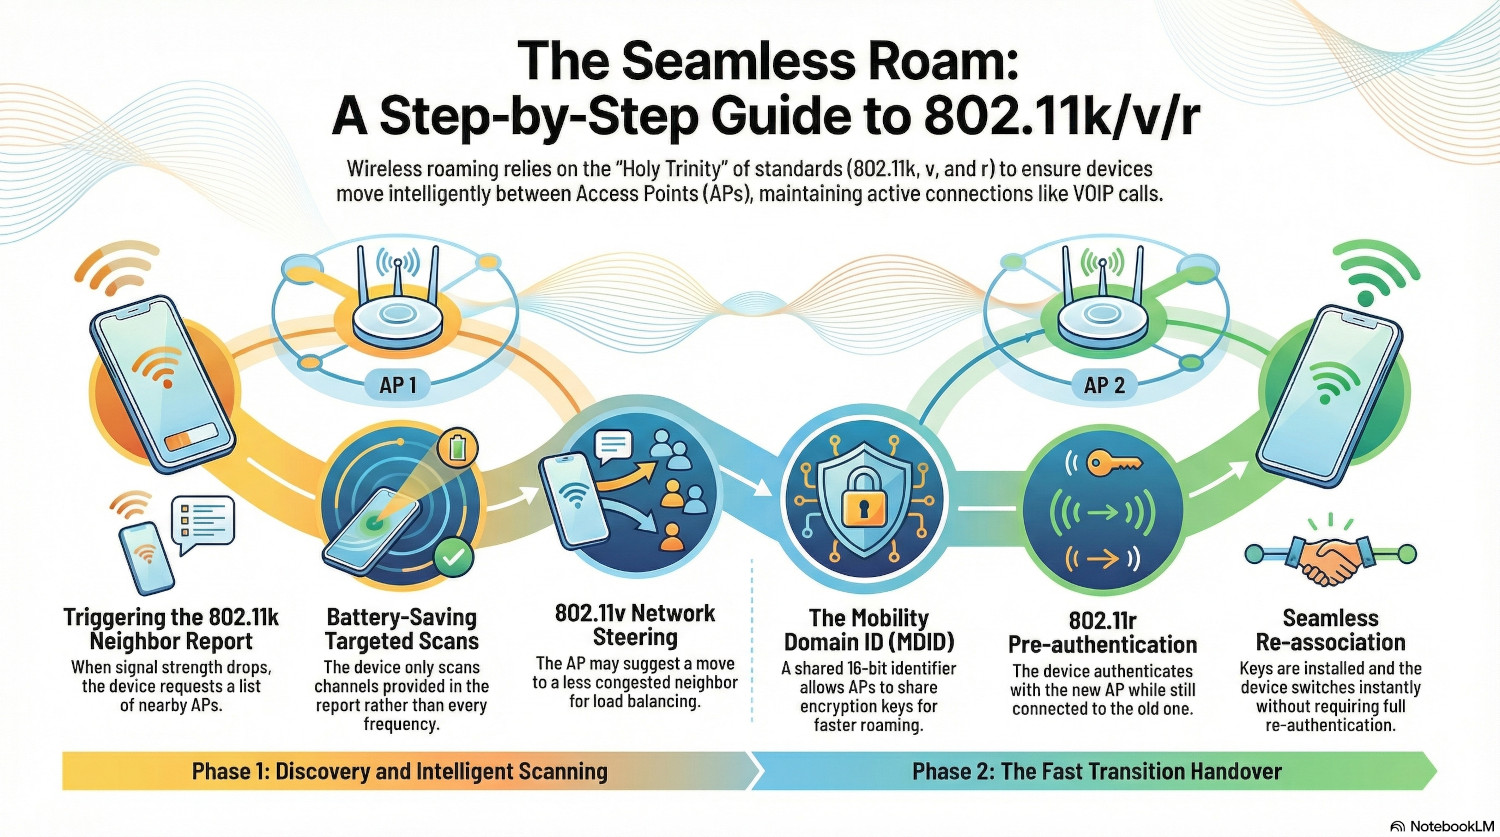
Step 1: The device detects the wireless signal for the current access point has dropped below the threshold set by the roaming aggressiveness configuration. It initiates an 802.11k Neighbour Report Request.
Step 2: The AP responds with an 802.11k Neighbour Report, detailing which other access points are nearby and on what channels.
Step 3: The device will then initiate a scan only of the APs in the report, saving battery life by not having to scan all channels.
Step 5 (Optional): If the AP decides that the client should move, it will send an 802.11v frame, telling the device there is a better AP for it to connect to. The device can ignore this frame.
Step 6: The device’s wireless card uses the configured roaming aggressiveness, the results of the scan and possibly the 802.11v frame, and makes a decision to roam to the next access point.
Step 7: The device remains connected to the first AP, but simultaneously sends an authentication frame to the next AP using the Mobility Domain ID. Because the APs are in the same domain, the AP already contains a derivative master key for all users. The user and doesn’t need to authenticate. The AP responds positively to the client,
Step 8: The device sends a 802.11r re-association request to the new AP. The AP verifies the request and sends a re-association response.
Step 9: The keys are installed, and the device has now seamlessly connected to the new AP.
Step 10: The device may send an 802.11v response back to confirm it has moved.
Capturing Management Frames
Capturing these frames in action is tricky - mainly because Windows ‘hides’ them. The wireless card needs to be placed in monitor mode, which Windows doesn’t usually support. It can be done with specific USB adapters, or a Linux machine with a supported wireless card.
Most enterprise wireless solutions will have packet capture feature, allowing traffic to be captured from the access point rather than the client. Sometimes it’s useful to see both; if the device shows it sent an 802.11k Neighbour Report Request but the AP doesn’t see it, then that shows a clear issue!
Once the data has been captured it can be examined in Wireshark. The following filters can drill down on the roaming frames.
| Target | Filter |
| 802.11k Neighbour Request | wlan.fixed.action_code == 4 |
| 802.11k Neighbour Report | wlan.fixed.action_code == 5 |
| 802.11v Transition Request | wlan.fixed.action_code == 23 |
| 802.11v Transition Response | wlan.fixed.action_code == 24 |
| 802.11r Auth Request | (wlan.fc.type_subtype==0)&&(wlan.rsn.akms.type==3) |
| 802.11r Auth Response | (wlan.fc.type_subtype==1)&&(wlan.tag.number==55) |
| 802.11r Re-association Request | (wlan.fc.type_subtype==2)&&(wlan.tag.number==55) |
| 802.11r Re-association Response | (wlan.fc.type_subtype==3)&&(wlan.tag.number==55) |
Conclusion
Modern users aren’t confined to a desk, they are walking around, going between meeting rooms and water coolers while requiring connectivity.
With these roaming standards, their devices are mapping out the network with 802.11k, suggesting better alternatives with 802.11v, and removing any lengthy delays when moving around with 802.11r.
802.11r gives us the speed, but 802.11k and 802.11v give us the intelligence. Between them they form the holy trinity of roaming standards.